La Chatte Gitane (or The Gypsy Cat) was the name we chose for our cottage in France at the time. We chose it while on the road, moving house the first time round, from Ireland to France with 2 dogs and 7 cats in the car.
This blog began its insignificant life as a recipe book for friends and family who would ask me repeatedly for a recipe of this, that and the other.
Since then it has taken many different directions, like we did and like gypsies tend to do. Sometimes making a U-turn and revisiting familiar roads and taking a break when necessary.
You'll find recipes here, but also musings about the places we've called home, the gardens that we've established, not always successfully, the homes we've improved and the environments we've lived in. Currently, after yet another stint in Ireland, we're back in France @ Le Mas d'Ayen

Showing posts with label recipes. Show all posts

Sunday, November 06, 2016

Making Sauerkraut

My mum used to make it around this time of year. But she gave me her Sauerkraut crock and to my shame I have to admit  I only produced my own once (a long time ago).
I have used the crock to make elderflower champagne a few times, mind you.

When I made the Sauerkraut before we were living in France and had a fantastic harvest of organic white cabbage. I never fancied making it from shop bought cabbage. It just didn't seem right to me.

On Saturday I harvested some cabbages from the veggie garden and decided to have another go at it.


They are absolutely nothing like the specimens from France and we had to share the ones here with slugs, millipedes and earthworms. A lot of cleaning was involved. Firstly I removed outer leaves (of which I kept the largest and nicest ones for later use) and placed the whole cabbages in the sink with cold water to which I added some salt.

I quartered them and placed them yet again  in slightly salted cold water.
Whatever is lurking underneath will soon be trying to escape from the kitchen sink or find its way to the bottom.
After removing the core, the cabbage then is finely sliced in long strips. I used a knife instead of food processor, just to makes sure there wouldn't be too much protein being smashed up and make it all the way through the fermenting process.


After another good wash, the cabbage, together with apples and onions is placed in a dry, clean recipient (in my case the sink once again with the plug in da hole) 


Salt, juniper berries and caraway seeds are mixed and massaged into the veg and left for 30 minutes or thereabouts.

Hello ! Hello ! Hello !
Sparkling clean crock.

 The cabbage then has to be placed into the crock bit by bit and pressed down really well.
The liquid that has been released in your recipient (in my case the sink) has to be scooped out and poured over the cabbage. 
The cabbage should be completely covered with liquid. If you don't have enough, top it up with mineral water.

Here is where the kept aside outer leaves come into play. They go on top. 
But that's not all.

 The pot comes with two weighting stones.

Above you'll notice the channel at the top of the crock. That needs to be filled with water before the lid goes on.

It makes the pot air tight. 

Off to the pantry with you. Blummin' heavy it is too.
Start the fermentation process. Soon we'll be hearing blubblub blub coming from the pantry.


Recipe

Ingredients
  • 6 kg cabbage - you can use a mixture of white and savoy or green cabbage, ratio 4 kg white and 2 kg other
  • 300 gr onion
  • 700 gr apples (acidic)
  • 70 gr sea salt
  • 25 juniper berries
  • 10 gr caraway seeds
Preparation
  • Remove outer leaves of the cabbage but keep the largest/nicest ones aside.
  • Halve or quarter the cabbages and remove the core. If the core is woody discard. If it is fresh and crisp it can be grated to go in with the rest of cabbage.
  • Slice the cabbage in thin long strips and wash in cold water.
  • Peel the apples and onions. Slice the onions thinly. Apples can be either grated or sliced.
  • Drain the clean cabbage.
  • In a large enough recipient (or clean sink with plug) mix the apples onions and cabbage together.
  • Add the salt, caraway and juniper berries. Massage well. Leave to stand for 30 minutes.
  • Layer the cabbage in the crock pot and press down each layer really well. 
  • Fill the pot up to max 10 cm underneath the edge.
  • Add all the drawn out liquid that has been released in your recipient. Fill up with mineral water to about 5 cm above the layer of cabbage.
  • Cover with large outer leaves and put weighting stones on top.
  • Fill the rim with water and close off with lid.
  • The crock should be placed in a room where the temperature is about 20° to 22° C for a week. That should start the fermentation process.
  • For the next three to 5 weeks the pot needs to be standing in a cool place (4° to 8°)
  • After a total of 4 to 6 weeks the Sauerkraut is ready for use. It can be kept for a few months, provided the cabbage stays covered with the liquid and is stored in a cold place.
  • Never throw away the liquid ! It is full of goodness and can be used as a refreshing drink or as a starter for the next batch of Sauerkraut.


I am really looking forward to this meal.
It is a photo from our time in France and I was cooking for a crowd. Served with mashed potato on the side it is a winner.


Patricia xxx...x

PS While writing this post (Sunday) I can already hear the blub blub blubbing coming from the pantry. The fermentation process has started.

Monday, September 26, 2016

Whoa There !

Every now and then I surprise myself. Yesterday was such an occasion as I got off my lazy bum and made a bit of food for the freezer. Not for the freezer as such but for us, to eat at a later stage and to make dinnertime prep easier for when I am busy doing other things.
Like sitting on my bum.

Bert has recently bought a pizza oven via t'internet (I really should keep him away from the 3 w's). It works with wood pellets. Which is great because we have them hanging around the house, seeing we normally use them as cat litter. As you do.

Anyway, I decided to make a head start with the dough. Just in case there will be a day somewhere in the future, without wind or rain, when he lights the pizza oven.
I made two batches of dough and divided each into 6 balls.


I wrapped them individually and placed them in the freezer.

 Last week I also organised two of our three freezers, by the way.

I still had massive beetroots from my friend Sophie which I had stored in the fridge.
They had a good roasting in the oven while I was busy doing other things. I saw this recipe on line for beetroot ravioli and thought if I portion off the right quantity of roasted beets, they can be frozen too.

The oven was hot from roasting the beets and I made use of that by chucking in two loaves of bread.


With the kitchen a mess, I thought, "what the heck! I'll make shortcrust pastry too"


Six portions went into the, yes, freezer and I made one pastry case for a quiche for today and one beetroot, goats cheese and smoked salmon tart for last night's dinner.


Layer sliced goats cheese, roasted beetroot and red onions sauteed with balsamico.
In a hot oven for 10 to 15 minutes. Add fresh goats cheese blobs and return to oven for 5 more minutes. Leave to cool for 10. drape with smoked salmon and drizzle with reduced balsamico. Sprinkle with black pepper. I just wish I had rocket to set it off a bit better, flavour wise and for photographic purposes.

The pastry was yummy. There is a reason why this is usually served as a small portion for a starter. It's rich !


Patricia xxx...x

Tuesday, September 13, 2016

Ossobuco Milanese


My first ever encounter with ossobuco was on my first visit with the parents of my first 'serious' boyfriend. Lots of 'firsts' in that sentence. That was 36 years ago (where has time gone ?). My then boyfriend's mum, Nadine cooked this delectable, succulent, fall apart meat dish. 
When finished all four of the family where looking at my plate. "Don't you eat the marrow ?" Ready to pounce. "Oh, you eat that ? Okay, I'll eat it too then. " That's when I was completely sold.

It's been on the menu regularly since then in my own home, whenever I can get my hands on veal shin, that is. And that was a while ago now, until Sophie gave me some, from their own rosé veal the other day.


Ingredients for 2
  • 2 to 4 disks of veal shin (2 to 3 cm thick)
  • flour to coat the meat (seasoned with salt and pepper)
  • olive oil (a glug)
  • 50 gr butter
  • 1 or 2 carrots, peeled and chopped finely
  • 1 onion, peeled and chopped finely
  • 2 celery sticks, washed and chopped finely
  • 1 fat clove of garlic, peeled and grated or finely chopped
  • 5 sage leaves
  • a few sprigs of thyme
  • a few shavings of unwaxed lemon peel
  • 200 ml dry white wine
  • 200 ml veal or chicken stock
  • seasoning and chopped parsley for finishing


Preparation

  • Give the meat a dust bath in the flour. I usually do this by putting flour and seasoning in a freezer bag, drop in some meat and shake it around while closing off the bag with your hand. You don't want to give yourself a dust bath, do you ?
  • On the hob heat the olive oil in a deep and wide enough frying pan to place the meat in one layer. Brown the meat crusty on both sides. Put them on a plate and set aside.
  • Turn down the heat and melt the butter. Add the vegetables (carrot, onion, celery) together with the lemon zest, garlic, thyme and sage. Sautee until soft.
  • Turn the heat back on high, place the meat on top of vegetables and pour in the white wine. Let it bubble until the wine has reduced by half.
  • Add the stock and return the heat to the lowest setting, cover with lid and simmer until the meat is tender.
  • Adjust the seasoning with salt and black pepper.
  • Sprinkle over the chopped parsely.
Serve this with creamy polenta, risotto or plain rice. We went for cappellini.


A year or so after the first visit with the boyfriend's parents, his mother made this again. It seems like we came full circle. He broke it off with me after that.
Oh well, I added a great dish to my repertoire and I've since met my wonderful husband, Bert. 


Patricia xxx...x

Thursday, September 01, 2016

Bacon and Cabbage


This traditional Irish dish never appealed to me. The idea of boiling cabbage for however long (to death) in the bacon cooking liquid, fills me with sadness.
I've never 'boiled' cabbage of the white or green variety in my life and I certainly won't start any time soon.
I've always sauteed cabbage in a bit of butter with yes, a little water or stock if necessary, and only to the stage of  'al dente'. Seasoning with salt, freshly cracked black pepper and a good helping of nutmeg, grated on the spot.
In modern Ireland sauteed cabbage is more and more the norm. Fortunately.

The bacon used is cured in brine and then boiled in water with flavourings like bay leaf, onion, carrot, celery....

We have smoked bacon from our pigs in the freezer and cabbage from the garden and I set to work to make a, for us appealing, bacon and cabbage dinner.


For the bacon
Ingredients
  • 1 bacon joint (enough for the family and/or leftovers)
  • cider (I used 2 ltr for this)
  • water
Preparation
  • Put the joint into a cooking pot.
  • Pour in the cider and top up with cold water till meat is covered.
  • Bring to the boil, turn down the heat and simmer 25 minutes per 0.5 kg (500 gr), plus an extra 20 minutes.
  • Take the bacon out and keep warm
For the cabbage
Ingredients
  • green, savoy or spring cabbage, 1 or 2, depending on size and density.
  • a knob of butter or lard
  • a splash of bacon cooking liquid
  • 1 tsp mustard
  • seasoning (salt, black pepper and nutmeg)
Preparation


  • Trim the cabbage of outer leaves, halve or quarter it and shred/cut into largish strips.
  • Melt butter in a cooking pot and turn heat up high.
  • Add the cabbage, stir and turn heat low again. 

  • Sautee until al dente
  • You might need that cooking liquid to prevent burning the cabbage.
  • Add the mustard and season.
  • If you wish you can add cream or thicken with cornflour in a bit of milk.
Serve  this with a thick slice of bacon and boiled or steamed potatoes.


Now don't discard the cooking liquid. Store it in the freezer or make a soup with it straight away. I did. I made a whole pot of delicious erwtensoep/snert or pea soup in English.  Recipe to follow soon.

Patricia xxx...x

Thursday, August 25, 2016

Beetroot Salad, Smoked Salmon and Courgette Fritters


Just a little something I threw together the other night for dinner with vegetables that are growing sparsely in our garden. Even the courgettes are letting me down this year.

For the courgette fritters I can recommend the link to my recipe here.
I added spring onions/scallions instead of a 'normal' onion, a few sweet and sour chopped up gherkins and a tablespoon of capers.

I grabbed a few beets and boiled them till tender. Peeled and sliced them. I put them aside in a dressing made with honey, stem ginger syrup, olive oil and white wine vinegar. Season with salt and black pepper. Oh and fresh dill !

A tub of sour cream (200 grs) and a heaped tablespoon of horseradish sauce was a nice accompaniment for the whole dish.

Serve with the smoked salmon and lettuce leaves it made for a lovely and refreshing dinner.


Patricia xxx...x


Tuesday, January 26, 2016

Wot's This Then ?

Is it a quiche ? Is it a sorta Spanish omelette ? A frittata  ?


Call it what ye will. I needed to use up eggs !
We're obviously not keeping up with our chickens. They are laying more eggs than we are prepared to eat on a daily basis. While I try to come up with a recipe that uses a hundred eggs in one go, they keep on accumulating in the pantry.
Sunday was the day I hard boiled fifteen eggs to use in an egg mayonnaise - salad type of thing.
But I also wanted to make something that would do as  dinner. Not too much fuss as I was still in the grips of a flu. With the feeling of a boa constrictor squeezing the bejeesus out of my chest, the only thing I wanted to do was lay down and play dead.
Unfortunately my appetite never dies so I set to work. Cooked everything in the oven.

Preheat the oven to 180°C (fan assisted)
Line a roasting tin with baking paper (my tin is 21 x 36 cm)

First step
Ingredients

  • 2 medium potatoes, peeled and sliced into 0.5 cm disks
  • 3 medium sized sweet potatoes, peeled and sliced into 0.5 cm disks
  • olive oil
  • 1 tsp salt
  • 1 tsp cumin
  • 1 tsp garlic powder
  • 1 tsp Provençale or Italian dried herbs
  • 1 tsp smoked paprika

Preparation

  • Put the potatoes, oil, herbs and spices onto a baking tray toss around that you have an even coating of oil and spices.
  • Put the tray in the preheated oven and roast for 15 to 20 minutes.
  • Transfer the potatoes to a bowl and set aside.

Second step
Ingredients
  • 2 large onions, peeled and sliced in rings
  • 1 red and 1 yellow pepper, sliced (in rings or  lengthways)
  • olive oil
  • 1 tsp salt, 1 tsp cumin, 1 tsp garlic powder, 1 tsp Provençale or Italian herb mix, 1 tsp smoked paprika
Preparation
  • Spread the veg out onto your tray with olive oil and spices

  •  In the oven with it ! For 15 minutes

  • Set aside

Third step
Ingredients plus of course yer roasted veg
  • olive oil
  • 200 grs goats cheese, sliced
  • 12 eggs
  • splash of milk
  • salt to taste
  • a small bunch of coriander leaves
Preparation
  • Take your roasting tin with the baking paper and drizzle with olive oil
  • Layer with potatoes, other veg and goats cheese

  • Beat the eggs with the salt and milk. Add the chopped coriander leaves and pour over the veg.
  • Place it in the hot oven for 30 minutes or until the eggs have set.
  • Leave to rest for 10 minutes before lifting the 'whatever-you-gonna-call-it' out with the lining paper.
  • Slice and serve however you like.

I obviously made enough to have leftovers the next day.
A great meat free meal it was too. And while the written down recipe seems long, it was ready in no time (except for the hour in the oven)

If you don't like goats cheese, use another cheese.
If you don't like cheese, don't use any.
If you don't like coriander, use parsley or nothing of the sort.
If you don't like eggs, tough luck !


If any of my friends in the area want some free eggs, come and get some. I'm not going to start a delivery service. Capiche ?

Patricia xxx...x


Friday, January 22, 2016

Duck Breast with Asian Style Salad


If only you had made my Asian Flavoured Bread and Butter Pickle then this recipe would be a doddle. I used the vinegary brine as a base for the dressing for this salad, along with some of the pickled cucumbers, onions and chilli.
Never mind, you can still make a lovely dressing from scratch.

The dressing
Ingredients
  • small clove of garlic, peeled and crushed or grated
  • 1 cm piece of ginger, peeled and grated
  • 2 tbsp rice wine vinegar
  • 1 tsp light brown sugar
  • 1 tbsp sunflower oil
  • 1 tsp sesame oil
  • a dash of soy sauce
Preparation
  • Put all ingredients into a jar with lid. Shake it, shake it, shake it ! Ready !

The duck breast
Ingredients
  • 1 duck breast
  • 1 heaped tsp Chinese 5-spice
  • salt
Preparations
  • Score the skin and rub the breast all over with salt and the 5-spice
  • Place it skin side down in a cold pan and fry over medium heat for about 6 minutes
  • Turn over and cook for another 4 to 5 minutes
  • Take it out of the pan and let it rest for 10
  • Slice the breast meat in thin slices.

The salad
You can use many variations of vegetables for such a salad. The choice is yours.
Ingredients
  • 1 large carrot, peeled and grated
  • my pickled cucumber (you can use fresh cucumber and slice in fine batons)
  • 200 grs (or thereabouts) beansprouts. You can use them raw or slightly blanched.
  • a piece of both red and green pepper, sliced in thin batons.
  • red or green chilli (to taste),  sliced in rings at an angle
  • a handful of cooked rice noodles (cooled)
  • 1 or 2 spring onions, sliced at an angle
  • coriander leaves
Preparation
  • Put all the ingredients (except the coriander) into a bowl and mix it well with the dressing.
  • Leave to stand for at least 15 minutes.
  • I arranged some lettuce leaves on a plate before spooning on some of the salad.
  • Add the sliced duck breast.
  • Sprinkle with some coriander and drizzle with sweet chilli sauce (if you have it)

Thinly sliced white cabbage and radishes would be a great addition too.
This recipe is enough for 2 servings as a lunch or dinner even. You can easily adapt the quantities  to your needs.
I was on my own when I made this - Bert was away (haha !). The next day I served myself the second portion like this :


And if you are vegetarian, you can always use some marinated tofu instead of duck, of course.

Have a good weekend all !
Patricia xxx...x

Wednesday, January 20, 2016

All Natural Medicine


For winter blues, colds, coughs, sniffles and general flu like symptoms.
Anyone coming into my home suffering from any of the above will be treated by moi to a mug of this. Generally the first few gulps will be accompanied by faces being pulled in all directions and exclamations like "Bleurgh ! This is strong. What is it ?" But as the golden liquid finds it's way down, you can hear sighs of relief by the drinker.
Usually I make it per mug, but this time I got myself a jug full, because I'm feeling a little meh! I can then reheat it throughout the day as and when.

The recipe for a jug (1.5 ltr)

  • juice of 3 lemons
  • 2 heaped tablespoons of honey (and then some)
  • 6 cm piece of ginger, peeled and grated (over a recipient to collect the juice too)
  • a little bit of cold water (150 ml or so)
  • boiling water to top up
Stir the first 4 ingredients together in a jug and top it up with boiling water. I always add cold water first, because you are not supposed to hit honey with anything boiling. Apparently it diminishes the healing properties. The feelgood factor will be received when you drink this hot, but is also very refreshing cold. 
I also like to spoon out the grated ginger that settles at the bottom of my mug. Feeling better already !

Patricia xxx...x


Tuesday, January 05, 2016

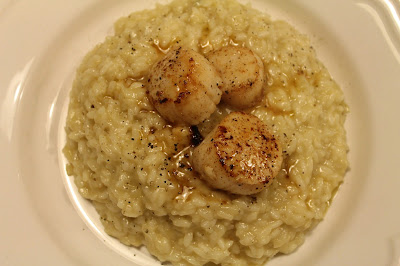
Celeriac Risotto and Scallops


I live by the sea and unless I go out for a dive (which I never do by the way), there is no scallop to be found for me to buy anywhere near.
Luck would have it that I found frozen ones in Lidl. I bought two packages as it is only a temporary article. Don't sneer ! Lidl is the only one that delivers on price/quality here in the area and where possible, their products are local (as in Irish). Again, don't sneer ! Frozen scallops are great if you treat them well.
Treat them well by defrosting them slowly. Dry them off properly with kitchen paper, et voilà, ready to use.

I had bought them way before Christmas and was contemplating how I would be serving them. I came across a photo on Pinterest and even though the link was broken it had the ingredients listed for scallops with parmesan risotto. I did my own thing, as you do. Not my first time cooking risotto or scallops.

Ingredients for 2 greedy buggers

  • 1/4 celeriac, peeled and cubed small
  • 250 ml chicken or veggie stock
  • 1 onion, finely chopped
  • 1 fat garlic clove, grated
  • 3 tbsp olive oil
  • 2 cups Arborio rice
  • 250 ml white wine (dry)
  • 750 ml chicken or veggie stock, keeping it on the hob at simmering point.
  • 2 handfuls of grated parmesan
  • salt and black pepper
  • 12 scallops
  • salt and black pepper
  • 1 heaped tbsp butter
Preparation
  • Start with cooking the celeriac in 250 ml stock till tender.
  • Use a stick blender or food processor to puree the celeriac. Set aside.
  • Sautee the onions in the olive oil till translucent. 
  • Add the garlic and the rice.
  • Stir and coat the rice grains in the oil.
  • Add the white wine and stir till it has evaporated/ soaked up by the rice.
  • Pour in ladle per ladle of hot stock and keep stirring to prevent anything sticking to  burn the bottom of the pan and to release the starch in the rice, which makes it creamy. Each ladle needs to be evaporated before the next one goes in. Do this on a low setting.
  • Keep going till the rice is cooked through but still al dente. I have to admit that I needed a bit extra water as I didn't use Arborio, but another unspecified risotto rice which takes much longer to cook through.
  • Add in the pureed celeriac and heat through.
  • Take off the heat and stir in the cheese.
  • Season with salt and pepper to taste.
  • Cover with lid and set aside.
  • In a frying pan melt and slightly brown the butter.
  • Season the scallops and sear in the pan, 1 minute on each side.
  • Serve the risotto on plates (warmed), delicately put the scallops on top and don't forget the cooking juices from the pan (coz that's the best bit, I tell ya)
Delicately, for the picture.

Then add some more and tuck in.

Patricia xxx...x


Related Posts Plugin for WordPress, Blogger...