Yes. I did manage to finish them, with a few hick-ups along the way. They are far from perfect, nevertheless, they give me great satisfaction that I made them myself and without breaking the bank.
I have made roman blinds before. Large ones for our living room in Belgium. You can see them
here.
They were a single layer of fabric. This time I opted for a lining, of the same material I used for the front. We already had the material from a previous shopping trip to Ikea. Plain white cotton (you can never have enough plain white cotton lying about), 140 cm wide and cost us €4 per meter.
I am not good at giving a perfect description of the process of making blinds, but I have a couple of links for you that are clear and precise.
How to make a roman blind by ooobop
Make a roman shade
All the other things you'll need you can buy on-line, if like us you live in a remote location.
Materials, On Line
I have plenty of photos to show. They could (or not) help if you're ever inclined to make your own blinds.
Before you even start, pre-shrink your fabric if it is cotton or linen. I simply washed mine and put it in the dryer. According to a seamstress acquaintance of mine you have to soak the fabric till it's dripping wet and then drip dry it on the washing line. The choice is yours.
You'll need a window. An empty table and sewing machine. Ironing board and steam-iron. Your pre-shrunk (and ironed) fabric. Two feline helpers (optional)
Pins. You'll need pins, lots of them. Measuring tape, a long straight edge tool or ruler and a right angled (90°) square. A sketch with your measurements and a pencil ( hard/HB)
Hook and loop fastener. As long as the width of the blind you're about to make, plus some extra (you just never know). The hook tape can be self-adhesive, while the loop tape should be suitable for sewing. You can buy them separately. A word of warning : don't try and use self-adhesive loop tape as you won't be able to sew through it. I have learnt the hard way with a previous project.
Wooden dowels and batten.
Screw eyes and plastic or metal rings.
Pull cord and cord pull (funny that)
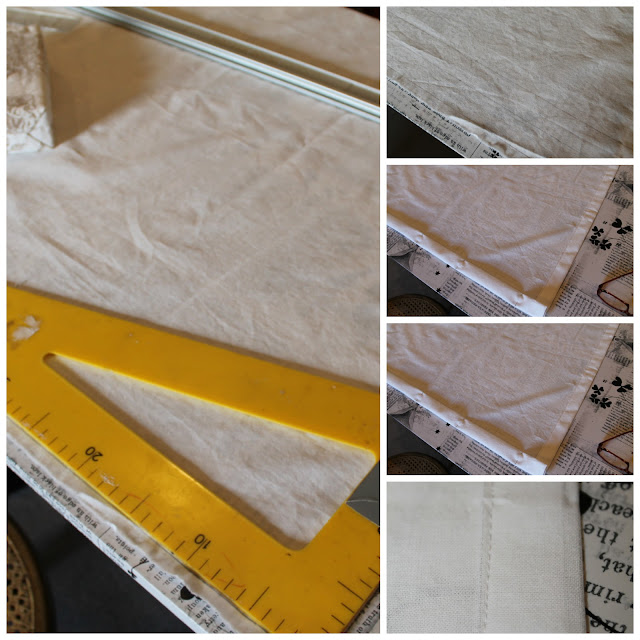
Straighten out the fabric and measure to the required size, plus 5 to 6 cm extra on each side. That is for the hem/seam. And here is where I am going to send you to the links above.
Just an extra tip. I used my pencil to draw the folding lines before pinning. After pinning it is best to press the seams in place with the steam iron.
I suggest you use the square as much as possible, especially when using a plain fabric without a design on it.
Here is where I marked and pinned the dowel casings. It is advisable to press them in place too by means of the iron before sewing.
Bringing the two pieces of fabric together and attaching the loop tape.
Sewing on the rings
Putting the dowels in place before...
... threading the pull cord through the rings. Fasten one end of each on the bottom ring (by means of a knot) and thread through the rings above.
I pinned my cords at the top. I then guided them along the top towards the left and back down again. You'll need a decent length to be able to attach it to the cleat. Don't cut the cord too short !
To the left because in my case, the cleat is on the righthand side of the window. And I'm looking at the blind from the back.
Still not confusing enough to go and look at the links I gave you ?
The screw eyes in the batten should correspond with the distance between the rings (vertically). You'll need an extra screw eye on the same side as your cleat hook. This to guide the pull cords all together.
Attach batten to wall with suitable plugs and screws (we also used glue to add more strength). Stick hook tape to batten. And as you can see, we stapled also.
I need to have words with a certain mister about the 'installed' cleat. Tsk!
Hang the blind at the window and guide the cords trough the screw eyes. Yes, also through the extra one at the side. Leave the blind in its closed state and cut the cords a little longer than the position of the cleat. Cut them too short and you might have to jump to reach them if your windows are a bit high.
Finish off with a cord pull.
Daytime.
Nighttime.
Wishing everyone a sunny weekend.
Patricia xxx...x


