Pages

Sunday, December 22, 2013

Decorating for Christmas - Table Decorating

I was planning on posting this one a little earlier, but lightning struck on Thursday morning and it blew up the modem and more.  The internet was back yesterday - thank you Eircom for working Saturdays - so now I can show you how I decorate my dining table for Christmas.
It'll be short and sweet, this article, as I am a bit in a hurry with  The Feast of the year looming.


Here is how I do it to blend in with the overall bohemian feel. I like to keep the decorations low level as not to obstruct guests' view of one another. It makes for more pleasant conversations when the person across the table can see you.

1 roll of turquoise paper table cloth
a pair of lace curtains (bought these in Ikea)
2 strands of faux pine green
foraged twigs of laurel, juniper, conifer, ivy, birch or beech...
3 to 4 pomegranates
clementines
bunches of grapes red and green
walnuts or other nuts in their shells

  • I first dress the table with the coloured paper table cloth. See that I have enough overhang on all sides 25 to 40 cm should do fine.
  •  On top of that I lay the lace curtain, which allows the colour to shine through.
  • Now is the time to plan in my head where people are going to sit.  I don't want the decorations to interfere with the place settings. Leave at least 40 cm free form the edges of the table.

  • I first lay the faux pine garlands in the middle, parallel with the longest side of the table.
  • Then I dress with the foraged twigs. Intertwine with the faux garland.  Groupings of real stuff together works best.  Strands of ivy pop out and over the whole length of the arrangement.
  • I bring in the fruits, which I also distribute in splashes (not literal) of colour throughout
    .

  • A few candleholders, nothing to high and elaborate, will bring this together.
  • Place the plates and cutlery, glassware, napkins and I am ready to roll.


Let the food fest commence.


With this, I want to wish you all a Happy Christmas.  Make it one to remember for all the right reasons.
Patricia xxx...x

Monday, December 16, 2013

Decorating for Christmas - Time for a Break

Just a general sense of wellbeing in the house.  Time for a break from Christmas prepping.


Even the dogs are having a break - from mischief.

Do you take time to stop and relax on regular intervals from all the chaos that enfolds at this time of year ?

Patricia xxx...x

Friday, December 13, 2013

The Kittie Corner and a Morning Welcome from the Dogs

Sweet.


Good Morning, Mummy ! I didn't do it ! Neither did I, I'm just putting back the scatter cushions. It was the cats ! Honest !


Thanks for visiting.
Yours truly, the full time circus manager
Patricia xxx...x

Thursday, December 12, 2013

Make Your Own Simple Napkins


I'm on a roll.
It looks like I've got my mojo back and here I am, yet again, with a new blog post.

I have had a soft spot for table napkins for as long as I (but mostly my husband) can remember, but in the past I've always bought paper ones. Beautiful designs and vibrant colours, but paper ones, nonetheless.

Whenever I was out shopping and came across some pretty ones, I would buy. You know, just to stock up.  Bert would say  "What ? More napkins !?" 
And just like with the issue of the real/fake Christmas tree, after 20 odd years of nagging, I finally give in. Why doesn't this work the other way around ?   I've been nagging him to put his dirty clothes in the laundry basket and hang his still-wearable-clothes up on the hangers.  I've been nagging him for years about the food he spill on his T-shirts. He still turns his spoon around just before popping it into his mouth. Why ?!

I digress.  Since living here in Ireland I haven't come across beautiful paper napkins on my shopping trips, so I decided to make some fabric ones. And,.... and I make do with what I have lying around the house. 
For these I have repurposed an older Ikea curtain, natural coloured cotton. Cut it in 40 cm squares, which definitely is the minimum size, bearing in mind that you need to hem them over, which will take about 1 cm off on all sides.
After cutting to size, I took a snip to the corners of the square.  This made it easier to fold the corners neatly. See in the next few steps. Pin the hem in place.


If you have your iron nearby it will make things easier if you indeed iron the hems before or after pinning. The hems will stay in place better when you come to sew them.
I used a fancy stitch on mine, but you can keep it simple too.


When sewn, I used fabric markers that I still had from when we used to be art material shop owners way back when.  They still work.
I chose free flowing designs and I'll be making plenty more before Christmas arrives.


Nineteen to go.

Thank you for visiting. Come back soon.
Patricia xxx...x

Wednesday, December 11, 2013

Decorating for Christmas - The Entrance Hall and Stairway


Never have I lived in a house that had (in my eyes) such beautiful stairs like the house we've moved into now.  It's what sold this place to me. That and of course the fact that the property is right beside the water.  But you get my drift, it is somewhat the only redeeming feature of the house itself.

The first picture is how it was when we bought the place. The second one is after removing the ghastly dark wallpaper and a giving a lick of white paint on the walls and ceiling.


It wasn't at the front of my thoughts to decorate the banisters till I finished the tree and found out I had some faux pine garlands left over from years past.
I attached the lengths to the balustrade and trimmed with a few baubles and ribbons.  It is my first attempt to create a christmassy atmosphere on a stairway and I am rather pleased with how it turned out.


I will - closer to Christmas - add some ivy and sprigs of evergreen to give more depth and a fresh fragrant scent.

Thank you for visiting.  Comments are greatly appreciated.
Patricia xxx...x

Monday, December 09, 2013

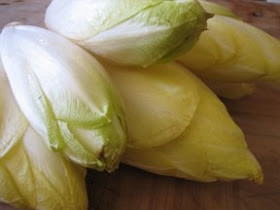
Missing from my diet right now...Celeriac and Chicory


I am pining for these 2 winter veg, it's almost unreal.
I know, I know.  We should preferably eat foods that are locally produced, but I bet we all eat oranges and bananas from time to time. And quite frankly my IBS needs a break from cabbages and turnips.
I can understand that the growing of chicory is a tricky one here in Ireland. But celeriac ?
I can remember the last time we lived here and a large Tesco supermarket opened in Killarney (somewhere in the late 90's), they had 1 (one) celeriac and it was displayed in the 'exotic' fruit and veg section. Needles to say that I immediately bought that specimen. Afterwards I don't think I ever saw celeriac again in any of the supermarkets.
That is till we came back and a Lidl supermarket had in the meantime opened in Kenmare.  About 2 months ago they had celeriac in stock ! Yipee ! ..... Once !
It's time I start thinking about my veg pad to be and grow some myself.

You want recipes for this delectable veg ? Here are some.
Celeriac and Smoked Salmon


Celeriac Mash


Fondant of Celeriac


Chestnut Soup


I have always known chicory to be available in Kenmare SuperValue,  2 pieces on a Styrofoam tray. Imported from The Netherlands and hydro-cultivated.  That is not how us Belgians like ours.  We love to eat them in the depth of winter, grown in soil. And we buy them with kilos at a time. 
While a chicory salad is great, we also like them braised in a bit of butter with nutmeg, black pepper and some salt. Nothing more comforting than tucking into a plate of that.
Braised chunks of chicory also do well in a quiche with some blue cheese. It makes for a tasty and creamy soup with potatoes added and finished of with fried off smoked lardons or even brown shrimp.
My favorite recipe though is the following Belgian delight. Braised heads of chicory, wrapped in cooked ham slices, covered in a cheese sauce and topped with grated cheese.  In the oven till it bubbles golden.
chicory recipe

How do you prepare yours ? Feel free to leave a comment.
Thanks for visiting.
Patricia xxx...x

Tuesday, December 03, 2013

Decorating for Christmas - The Tree


I've only ever known 'Real' Christmas trees till 4 years ago.  No way was I going with a fake one, I exclaimed when Bert would tell me to stop fussing around at the real-tree-provider's places until I got a perfect one.

Nature though, is fickle.  And the perfectly shaped christmas tree is difficult to find, so 4 winters ago I gave in and bought a fake variety that really looks the business.  It didn't come cheap, no.  But I've yet to meet someone who knows it isn't the real McCoy once it's decorated.

How to go about decorating the tree (real or fake). A few pointers first and I'll go in more detail later.
  1. Choose a colour scheme or  a theme. 
  2. Sort out baubles by colour and importance. Also the tinsel, garlands, ribbons need sorting by colour/size.
  3. Untangle your christmas lights. If you're anything like me they will be tangled up, even if you have rolled them up neatly last year.
  4. Place lights in said tree. 
  5. Drape the tinsel  garlands in tree.
  6. Hang baubles.
  7. Tie ribbon bows around branches.
  8. Tweak.
  9. Arrange star/angel... on top
  10. Admire.


These 10 steps to your perfectly decorated tree are all good and well, but each step needs a bit more explanation, in my opinion.  So here goes.


Colour scheme or theme.
  • If you choose a theme, the colour choice is of less importance as each of your decorations will speak for itself.  My best friend chooses to decorate her tree with angels of all sorts and her sister in law (also my friend) adorns her tree with birds. That in itself will create enough impact for them not to worry about a colour scheme.
  • When going with certain colours, make sure it doesn't clash with the rest of your interior, unless that is what you're going for, then do it with conviction and purpose. Most of us though coordinate the decorations to our sofa colour, scatter cushions, walls,..... You can of course change your cushions and throws for the season so that it makes for a cohesive look
  • I've gone through all kinds of colour combos in my time.  Red and gold, blue and silver, copper and burned oranges with gold thrown in.  For the last 3 years I've been collecting (buying) turquoise, duck egg blues, old and fuchsia pinks for my tree.  It works well with our interior which is mainly white with accents in these vibrant hues. I give warmth with my old gold and copper baubles.  My aim is for a bohemian inspired tree.
Baubles, tinsel and garlands
  • On your dining table sort out your baubles by colour - that's if you haven't bothered after taking down the decorations last year. Ahum. That's is what usually happens in our abode. This time I had them all stored by colour. I did this as I was starting to pack them up for our big house move to Ireland.

  • Most of my baubles have been provided (by me) with ribbons to tie them to the tree. I prefer them to hang close to the branches in stead of dangling off them. This is the time to thread the ribbons through or if you like to 'dangle', have the hooks ready.

  • Tinsel, ribbons and other garlands. If they are lenghty, pompous, big and all ladedah they will go in first, after the lights. More dainty ones go in after the baubles.  Arrange them on the table and you're in real trouble if you don't own a cat to help you out with this task.

 The Christmas lights
  • Here is my problem (or at least one of them). How many lights for your tree ? They come in so many diferent sizes these days now that LED lights are the ones to have, that I am flumoxed. The more lights in your tree the better the effect, so go for a vast amount of lamps. Go for as many as you can afford. 
  • Choose, warm or cold light, plain or coloured. An important factor all depending on the mood you want to create. I will always go for warm plain lights. And I don't want them to be flickering. If you go out to buy new lights these are all factors to consider and you'd better read the packaging as they normally don't come cheap.
  • If you have stored the christmas lights properly you will have no problems whatsoever with a tangled up mess. Ahum - yet again. If you have a husband with the patience of a saint (like mine) he will do all the untangling for you while you get on with more important stuff, like pouring another glass of port or putting on the next christmas cd. If you don't own one of these willing helpers you have to do the untangling yourself and beware, by the time you have polished off the bottle of port you will be left with the lights in more knots than when you started. Nowadays I don't touch the stuff.

Place lights in tree


  •  BEFORE you do untangle them, plug them in to see if they are sitll in working order.
  • The lights go in first. Hopefully you have found a place for the tree close enough near a socket. I always start at the top with the one end of the light string and spiral around the tree downwards as the electric source is nearer to the floor. Plug in and squint your eyes to see if the lights are evenly distributed. Tweak if necessary.
The tinsel garlands are in second.
  • They follow the same spiral direction of the light string. Just above or below. You don't want them obscuring all the twinkle that you have painstakingly wrestled with for the last three hours. Push them somewhat in between the branches too. You need the branch ends free for the baubles.
The baubles
  • I start with the biggest and most prominent ones. Distribute around the tree. I fill in the gaps with all the rest. Easy peasy. From time to time step away from the tree to look at it from a distance. Tweak.
Bows, ribbons, feathers and more tinsel
  • Ends of ribbons that I have gathered over the years will be tied onto the branches into bows. I also tie feathers in my favourite colours to the end of branches and end with angel hair tinsel.


Tweak one more time

Star, angel, fairy or peak for the tree top
  • Place carefully on top. It's the icing on the cake, the jewel in the crown.  I have two willow stars that I have given a lick of copper and gold.  They've been on the tree for years.

Step back and admire


Thank you for visiting and I wish everyone a happy christmas season.
Patricia xxx...x